Shapes
I made this 3D model in cinema 4D. In this program we use many tools to create certain things. It could be scenery, characters or objects. I used the cube, cone and sphere object tools to place the objects on to the stage. Then make sure they are lined up correctly. Next I added the floor to the scene. By selecting objects, scene then floor. Next was adding the colour by creating a new material. Also add a reflection to the colour. Then I added a pattern to the floor. Last I added the light position on.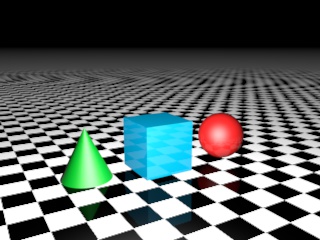
Ipod
I created this ipod in the cinema 4d program. First I took a cube and then I changed the shape to make it long and thin like an ipod. Then I added a plate shape for the screen and tube for the menu buttons.

Next I changed the tube to be flat and placed it on the changed cube.
Next I grouped the layers together and named it ipod. Then I added another plane object for the table underneath the ipod. Next was changing all the colours. I made a new material and made the colour on it red then I added it to the changed cube shape.

For the screen picture I had to get a picture of an album I like and add the ipod menu to the other side and then put it on photoshop to get the right size. Then I imported it to a new material and added it to the plane screen. I did the same with the menu. I also added reflections to all the material colours. Also I added the lighting position on it. Lastly I duplicated the ipod and rotated it to stand up next to the other one and changed the colours for that one.

Spaceship
First I got a cube then I used inner extrude to get the outline of a
square in the side then I used extrude. That pulls out the shape so it
might look like a cube with a long rectangle sticking out of it. Then
you can transform the shape using rotate and and move tool. I did this to
all the sides of the cube until it looked like the picture bellow.

After the shape is complete I added a HyperNURBS. This makes the object smooth and less cube-like.

Finally I added colours. First I added a capsule shape and placed it inside the front of the ship with it just poking out so it looks the the window of the ship. Then I made a new material which was red. I added it to the ship to give it colour. I made the capsule a light grey colour. Then I deiced something was missing so i added an engine on the back. I put two spheres in the back of the spaceship and then made them a glowing yellow material. To make it look like the fire of the engine.

Wine bottle and glass
Next we were shown how to make a wine glass. It started by drawing the shape bellow with a B-spline. Once we had drawn the shape we then added a LatheNURBS to make it a whole shape.

Next I used what I had learnt from making the spaceship to make the
bottle. I added a capsule and extruded the shape and changed it to look
like the picture. The to add a plane for the floor. I got a picture from the internet to get the texture for the floor. Next I made a new material which I made a clear colour and slightly transparent for the glass. Then similar for the bottle but I added a dark green colour.

For the top of the bottle I added a cylinder shape and made it the same colour as the bottle. Then I duplicated the shape and placed it on top but change the colour to black to make it look like the lid. Last I added one more shape on the top. A tube and then I coloured it black.

Tutorials
I decided to make open pokeball as practise. For this I partly followed a tutorial and partly made it up. First I was following the tutorial and it said to make a sphere and the halve it. It said to do a loop select which selects certain parts of the object I found it very useful. To make one part of the halved circle black I used the loop select and then made that ring a separate object so I could add a different colour to it.

Then I duplicated the object and added it on the bottom.

I stopped following the tutorial now as I was getting confused and tried to make the rest up. I needed it to look slightly darker on the inside so I had to add a colour to the inside. I couldn't figure out how to do this easily so I added the same shape inside of the open pokeball and just changed the colour. Then I added cyclinder and flattened it to make the circle infront of the pokeball.

Also I added another flat cyclinder to the middle of the other one to give it this effect. Last I added a light.


Character
We started off with a cube then we changed the camera angle to side
view. Next we used a tool that allowed us to just select the points of
the cube and move them. Eventaully we got it to look like the side view. Then we had to move more points to make the shape of where the arm would come out. when we had the shape we selected that area and spent time extruding it and rotating, transforming and moving it. Until it looked like the arm sleeve.

Then we had to mirror it because we had only done one arm. So first we
deleted the side without an arm and then mirrored the side that did. It
looked a bit square so I added a HyperNURBS to make it smoother. Last we
had to select the top of the t-shirt and bottom of the sleeves and then
we deleted them so it looked like the picture bellow.

Headphones
To Start with I added a circle with the circle tool. Then I kept duplicating it and I change the shape and possition each time to make it into the shape of the top of a headphone. I did this while looking at all the different angles to get the shape right. Once I'd done that I added a Loft NURBS. Then put the all the circle into the Loft NURB this joined up all the circles and made them soild.

To make the wire I had to use the ... tool to draw a line. Then I added a circle to the top of the wire. After that I put it into a Sweep NURB this created a long wire shape. I had to resize it and fit it into the top of the headphone. I also added a cyclider on the top of the headphone so I could add a speaker texture. I made a new material and got a picture off the internet to add to the cyclinder.

I also duplicated the headphone top and did a new wire for that one. I add white colour to the headphones and the wires.

Bear

I know for my final project I would like to build a character so I
practised making something very simple just by adding lots of sphere's
together and shaping them.


